Looking at the Ahimenes, you fall in love with these flowers again and again. This is some kind of extravaganza! Blossom so that the leaves are not visible. Today we will teach you how to correctly form plants, make pinching, and show you how to grow a beautiful flowering specimen from just one rhizomka.
 |  |
Rhizomes are different!

This is how the planting material of the Achimenes looks like. These are rhizomes. Different varieties - different forms of "earrings". When is it better to plant them? If you do not have the opportunity to provide the plants with additional lighting, it is better to postpone planting until March. If during storage the rhizomes began to germinate, the temperature should be lowered to + 5 ... + 8 ° C - the sprouts will freeze and will not stretch out. To do this, we place the rhizomki in the refrigerator in a fruit drawer and check them regularly. Temperature - not lower than + 5оС. It is better to plant sprouted rhizomes, since sleeping people have a risk of rotting when watering. The best time for planting is February-March.
If you have the conditions for early disembarkation, take the planting material out of the refrigerator. Rhizomes can feel spring and sprout as early as late December. Then you can plant them. But I definitely keep such early plantings under illumination, otherwise the plants will stretch out from the lack of lighting, and as a result we will get a weak flowering and an ugly bush.
Planting process
At first, I choose small pots for Achimenes in order to save space, but as the plant grows at the end of April-May, I transfer it to a larger, 1.5-2-liter pot, since in a small container the flowering will be worse and the "harvest" of the rhizome will be small ... I do not plant more than 4 plants in a pot; for one rhizome, a soil volume of at least 0.8 liters is required. Then I plant 4 plants in a 2-liter pot. It is advisable to choose wide pots, since the root system of the plant is superficial.
I put drainage on the bottom of the pot so that there is no stagnation of moisture. I use sphagnum moss with a layer of 2-3 cm. You can fill in expanded clay, broken pieces of foam, or not use it at all, if you do not have a tendency to flood plants.
Achimenes need a light, nutritious peat-based soil (like violets) to grow successfully. I add 1/3 of horse humus to it, but this is not necessary.

Rhizomes should be laid out horizontally and sprinkled with 0.5-1.5 cm of soil. The finer the rhizome, the less deepening. We do not cover the rhizomes with a film, the optimum temperature for germination is from + 18 ° C to + 25 ° C.
We do not water the pot with the planted rhizomes, but sprinkle it a little from a spray bottle and put it under the backlight or on a sunny window. Since the rhizome has no roots yet, they can rot. We water it limitedly until shoots appear. Over time, when the bush and root system begin to grow, we increase the watering, but wait for the soil to dry out between waterings. In summer, in the heat, we will water abundantly every day.
The subtleties of pinching and pinching
Now comes the fun part. How to form a bush so that you can't take your eyes off it during flowering. At the earliest stages of the growth of achimenes, we begin to form the plant by pinching.

When 2-3 pairs of leaves grow on the plant, we remove the crown with nail scissors - this is pinching. We do not throw out the tops of the heads - they, in parallel with the plants from the rhizomes, will give rise to new bushes and will have time to grow a bush no less than the plants from the rhizomes. Reproduction by pinning tops is an easy and reliable way of breeding achimenes.

In a small plastic cup with drainage (you can break the foam) and soil, we place these tops of the size of a match head.

We press the tops of the heads a little into the ground, lightly spray them from the spray bottle, put them in a bag with a zip-fastener and place them under the supplementary lighting. After 10 days, the cuttings grow up - this is a sign of rooting.

After 10 days, the plant whose crown has been pinched gives out two shoots, but in general there can be 3 or even 4. We repeat the pinching-pinching.These tops can also be rooted. So I pinch the plant from 4 to 7 times, until the buds appear.

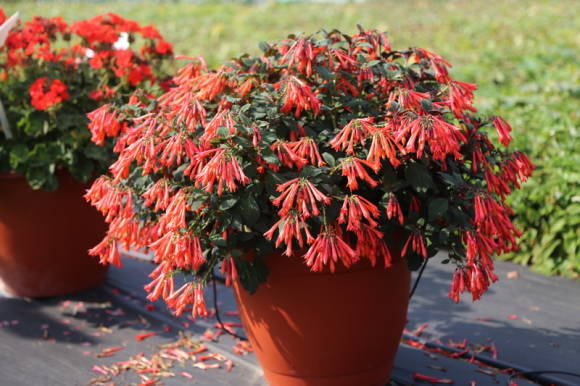
Here are the Achimenes formed, ready to bloom
Prishipka, of course, will postpone flowering for a week or a half, sometimes 20 days, but then it will be so gorgeous, then you will understand that it is worth it!
I pinch all varieties indiscriminately. The only variety, Ambroise Vershaffelt, does not bush well after pinching and does not need to be pinched.
Ahimenes from one rhizome
It is not at all difficult to grow a gorgeous blooming achimenes from one rhizome. At the emerging sprout, we remove the top of the head with nail scissors so that the plant does not strive to grow into one stem, it forms a fluffy bush.
We put the top of the head in the same pot, pressing it a little to the ground, cover it with cling film, make small holes in it for air exchange.
We send the pot under the backlight. A greenhouse effect is formed under the film, which contributes to the rapid rooting of the pinnacle crown.
When the cutting takes root, we remove the film, but it is still a little early to pinch and pinch. A little later, we cut off the tops of both sprouts and put them in the same pot.
Feeding schedule
Be sure to feed the Achimenes once a week. You can use any fertilizer, as well as alternate them. Fertilizers should be diluted strictly according to the instructions, it is even better to make the solution a little weaker in order to avoid burns.
You need to feed the previously watered plants. If the soil is dry, you first need to water it with clean water and when the plant gets drunk, only then feed it.
 |  |
At the initial stage, you need to grow a good root system - I water it a couple of times with Raikat Start fertilizer or any phosphorus fertilizer. The composition is always indicated on the package, we look at the ratio - there should be the most phosphorus.
Then we help to build up the vegetative mass - any fertilizers with a predominance of nitrogen, for example, urea, will do.
When the bush is already well formed, the green mass is sufficiently increased, we switch to potash (for flowering) - for example, potassium monophosphate, potassium nitrate, Raikat Final.
If we are too lazy to breed fertilizers or forget, we can use long-acting fertilizers, for example, Osmokot (0.5 teaspoon per 1 liter of soil). Yes, it is expensive, but just one application is enough.
 |  |
How the Achimenes are supposed to go to bed
Ahimenes belongs to the Gesneriaceae family and its name is translated from Greek as "fearful of the cold." His homeland is South and Central America. Therefore, for the winter, he hibernates. In the fall, when the flowering has completely stopped, we reduce watering to a minimum. First, the leaves, and then the stems, begin to dry out. Artificially, this process does not need to be accelerated (cut or break). All food rhizomki must receive in full from the bush.

When the shoots are completely dry, they are cut at ground level and the pots are placed in a room where the temperature does not exceed + 18 ° C. You can dig out the rhizomes, dry them a little and put them in a bag of vermiculite, for example, in a cool cabinet.
Check the rhizomki occasionally in winter. Dry if necessary. Ahimenes will start waking up in February-March. It is important not to miss this moment.
 |  |
Photo by the author