|
Probably, there is not a single grower who does not know about daylilies. They can be seen both in grandma's front gardens and in modern gardens. They say about him: "the flower of an intelligent lazy person", "planted and forgotten." Florists tell each other the myths that if daylilies are fed, they will not bloom. It’s not like that!
The original appearance of the daylily has changed beyond recognition. Modern hybrids require more close attention to themselves, however, they will not cause great difficulties. In a short growing season, they must increase the green mass, form flower stalks, bloom with gorgeous flowers and set seeds (if there was pollination). And our winters! This is a huge stress for hybrid varieties.
The fact is that most modern hybrids come from the southern states of America. In a word, these overseas sissies simply need our help so that they can fully reveal all their garden qualities in the difficult conditions of Central Russia. With just six correct steps, you can effortlessly grow this beautiful perennial in your gardens.
Step 1 - choosing a landing site
Some growers claim that daylilies will grow well in partial shade and even in the shade. Of course, such a place is suitable for species daylilies that grow in nature on forest edges, among shrubs. But if we are talking about modern hybrids, then in our climate only in the sun they will be able to fully manifest all their garden qualities. Hybrid daylilies should be sunbathing for at least 6 hours a day. However, it should be remembered that when planted in the sun, dark-colored varieties and varieties with a dark, almost black eye, burn and acquire the characteristic sheen of the petals. Almost white varieties are best planted in the sun itself. In this case, the barely noticeable shades of pink, yellow, melon, present in the color of such varieties, fade in the sun, and the daylily becomes almost white.
 |
Step 2 - landing
Daylilies prefer neutral or slightly acidic soil with a pH of 5-7. On strongly acidic and alkaline soils, they will be suppressed.
The best time to plant new daylilies and divide old bushes is spring, as well as late August - early September. At a later date, the likelihood of the death of the plant in winter is possible, because it takes about a month to root the daylily. When planting in autumn, you can insure yourself and make a hillock with earth or leaf humus, pouring a mound 10-15 cm high on the base of the plant. Remove the hillock in the spring. It is better not to use peat and sand.
If the need arose, then you can transplant daylilies, even flowering bushes, throughout the summer season. After transplanting, it is better to shade the plant.
If you have nutritious garden soils on your site, then to plant the daylily, it is enough to dig a hole of such a size that the roots of the plant are freely located in it. On heavy soils, we make the planting hole twice as large as the root system and fill it with pre-prepared soil. To improve the texture of heavy loams, they must be mixed with high-moor neutral peat and sand in a ratio of 3: 2: 1. Add leaf humus and compost.
At the bottom of the planting pit, we form a mound and place a daylily on it, carefully spreading the roots in different directions. We begin to cover with earth, squeezing the roots from all sides with our hands, but do not fill the entire hole at once. We spill it with water, add earth, compact the soil again. When planting on heavy soils, we deepen the root collar by about 2-3 cm. On sandy soils, the planting depth can be 4-5 cm. Add a couple of handfuls of ash to the planting hole. As you know, ash contains such important macronutrients as phosphorus and potassium, which are necessary for plants to build up the root system.
The distance between the plants when planting is 60-70 cm. For low-growing curb varieties, this distance can be reduced to 30-40 cm. While the daylily clumps grow, the empty spaces between them can be occupied by annuals or perennials, which can then be easily removed.
In the first year, the flower stalks of daylilies are recommended to be removed in order for the plants to take root faster. However, the removal of the peduncle can completely provoke the appearance of a new one. On my daylilies, I leave a peduncle with 2-3 buds, pluck the rest. The plant performs the flowering-reproduction program laid down in it and does not lose much energy.
If the planting material has been stored for a long time, and the roots are dry and wrinkled, then soak them in water for several hours before planting. As soon as the roots are swollen and saturated with life-giving moisture, you can start planting.
Step 3 - watering
Adult daylily bushes have a high degree of drought tolerance due to a powerful, deep and branched root system. Its fleshy, thickened roots are capable of storing an adequate supply of water. Water the daylilies as needed, according to the weather conditions and the composition of the soil in your garden. Mulching plantings will allow you to retain moisture and reduce the frequency of watering.
 |
During the period of budding and flowering, the need for daylilies in water greatly increases. Do not let the soil dry out completely. Sharp fluctuations in soil moisture can often lead to the drying out of some of the buds on the peduncle. That is why during the period of budding and flowering, uniform watering for daylilies is more important than ever.
Daylilies, like other perennials, do not like surface watering. It is better to water less often, but correctly, saturating the soil with moisture to a depth of 20-30 cm. It is best to water daylilies early in the morning or in the evening. You can't water in the midday heat. The optimum temperature for irrigation is + 20 + 25 ° C. When watering with cold water, the roots of the plants are shocked.
What way to water daylilies - "under the root" or by "sprinkling" - each gardener decides for himself. It is believed that water droplets falling on a daylily flower during rain or watering cause damage and discolored spots on the petals. In my garden, I sprinkle daylilies all night, ending early in the morning. The soil is evenly wetted, and by the time the flower opens, all the petals have time to dry out. There are no stains or damage on high-quality varieties, and if the variety is prone to staining, then this is a drawback of a particular variety, and not a method of watering.
Step 4 - feeding
There are no uniform recommendations for feeding daylilies. Mature shrubs and freshly planted cuttings need different amounts of nutrients. You should also take into account the mechanical composition of the soil. Refined loam holds nutrients better, and on sandy soils they are quickly washed out, especially in rainy summers.
For normal growth and development, daylilies need a balanced diet, which is provided by macro- and microelements. For feeding daylilies, you can use both organic (mullein, horse manure, herbal infusions) and mineral fertilizers. Each grower decides for himself what suits him best. You can use complex mineral fertilizers of prolonged action, which will provide the plant with nutrition during the entire growing season, as well as water-soluble complex fertilizers with microelements in a chelated form. The latter are quickly absorbed by plants during root feeding, and spraying on the leaf (foliar feeding) gives the result within 3 hours. But, unfortunately, the effect of water-soluble fertilizers does not last long, up to two weeks. Root dressing can be alternated with leaf dressing.
For the correct use of fertilizers, it is necessary to understand what effect macro- and microelements have on plants. The three main nutrients are nitrogen, phosphorus and potassium. The plant needs them in the first place, since they are consumed in large quantities for growth and life.
Nitrogen (N) - is necessary for daylilies to a greater extent in the spring, during the period of active growth. The introduction of nitrogen at a later date will provoke the growth of the vegetative mass, which is undesirable on the eve of winter and will negatively affect the wintering of the plant.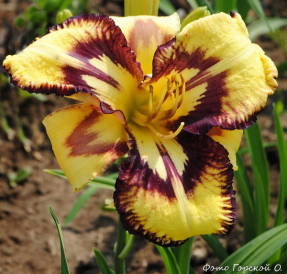
- Phosphorus (P) - essential for daylilies at all stages of development. Phosphorus contributes to the growth of the root system, the setting of seeds (if pollination has occurred), and also increases the resistance of plants to diseases.
- Potassium (K) - is also necessary at all stages of development, especially during the flowering period. It contributes to obtaining flowers with more persistence, which is important for dark-colored varieties, and bright colors. And also increases the resistance of plants to diseases.

An important rule: before feeding the plants with liquid and granular fertilizers, they must be shed well. In dry form, fertilizer must be scattered between the bushes, then embedded in the soil and again shed abundantly. You need to scatter the fertilizer very carefully so that the granules in no case fall into the center of the leaf outlet
To feed daylilies, you can use the standard scheme:
1 top dressing - spring, active growth.
It is done during the period when the soil warms up to + 6 + 8 degrees Celsius, in late April - early May. It all depends on the weather conditions. Usually the leaves of daylilies at this time have already grown to a height of 10-15 cm. We apply a complex fertilizer containing nitrogen, phosphorus and potassium, as well as trace elements. Nitrogen will give a good start for growth, while phosphorus and potassium will help promote root development. 2 top dressing - budding period. To obtain better flowers during this period, you can use fertilizers with less nitrogen, with a shift towards potassium. Also during this period, daylilies need such trace elements as calcium (CaO) and magnesium (MgO). 3 top dressing - end of August - beginning of September. At this time, daylilies have a short period of rest. It is necessary to make top dressing with phosphorus-potassium fertilizers, which stimulate the setting of flower buds for flowering next year, and also increase the resistance of plants to unfavorable winter conditions. You can use an autumn complex fertilizer with a low nitrogen content and a high percentage of phosphorus and potassium. Ash is perfect for autumn dressing. There is no nitrogen in it, but it contains about 30 macro- and microelements. Now phosphorus is needed more than ever, for those daylilies that have been divided. It promotes the formation of the root system and accelerates plant survival. In a rainy summer, when nutrients are especially quickly washed out of the soil, foliar dressing can be done - spraying on the leaf. After all, as you know, liquid top dressing on leaves is several times more effective than root dressing. Foliar dressing can be done only in the morning or in the evening. For these purposes, you can use a liquid concentrated humated fertilizer with macro- and microelements, as well as a complex water-soluble fertilizer. You can use infusions of chicken manure, mullein, nettle, horsetail, or any fermented herb. It is necessary to spray on the back of the leaf, where the largest number of stomata on the leaves are located, with the help of which the plants absorb nutrients. In caring for daylilies, you can apply standard feeding regimes or observe daylilies, and at the first sign of a lack of any nutrients, provide them with first aid. How do you know what nutrients your daylilies are missing? If the leaves become smaller, lose their intense green color, growth slows down and the bush blooms poorly - this indicates a lack of nitrogen.With a lack of potassium in the soil, the edges of the leaves turn brown. Old leaves turn yellow and die off. Freshly planted daylilies can only be fertilized 7-10 days after planting. If you have fresh, nutritious soil, you may not need to feed daylilies in the first year. Whichever method you prefer to feed daylilies, always remember to use fertilizers wisely. The most correct decision is to conduct a soil analysis on the site, but usually very few people do this. Daylilies are better underfeeding than overfeeding. Growing green mass can be detrimental to flowering. The use of mulch in flower beds has recently become more and more popular. It suppresses the growth of weeds, prevents overheating of the soil and plant roots, and reduces the evaporation of moisture from the soil surface. Usually used mulch from pine and larch bark of the middle fraction. The latter is more durable. A bag with a volume of 60 liters is enough for filling 1 sq. m of a flower garden with a layer of 5-6 cm thick. If you use mulch in your flower beds, then when feeding daylilies with granular fertilizers, you must move it away from the bush and make sure that the granules get into the soil, and not on the mulch. It must also be remembered that when decomposing, mulch absorbs nutrients from the soil, especially nitrogen. Therefore, when feeding mulched plantings, the amount of nitrogen must be increased. During the season, cut grass can be used as mulch. She quickly overheats and saturates the earth with nutrients. There is one drawback - the process of overheating of the grass occurs quickly enough and it is necessary to frequently renew the mulching layer. It is also possible to bring a large number of weed seeds into the flower garden if flowering plants have been cut. Novice daylily growers are very concerned about the question: when is it better to cut daylilies so that they winter well? Autumn or spring? Based on my personal experience, I can say that the timing of pruning does not in any way affect the quality of wintering of daylilies. You can do this at any time. If you decide to prune the daylilies in the fall, the most important thing is not to prune too short and too early, otherwise the daylilies will grow again, which is undesirable due to the approaching winter. Usually in October, when the first frosts come, the leaves of daylilies are cut to a height of 10-15 cm from ground level. If the pruning was postponed for the spring, then, as soon as all the snow melts, it is necessary to quickly remove the sour and dried leaves. The decay process on the leaves can go to the root collar of the daylily. Another question that haunts daylily lovers: what types of daylilies winter better? Daylilies of all types winter well in our climate with sufficient snow cover. No special measures to prepare for the winter (protection and shelter) of adult bushes are necessary, except for the hilling of new autumn plantings in the first winter. The most important thing is that there are no prolonged thaws in the middle of winter, and there is enough snow in severe frosts. Dormant varieties sleep in winter, and evergreens wake up during thaws and can begin to grow. In the absence of snow, subsequent frosts can destroy the awakened buds. But not everything is so scary. Usually, in the spring, new replacing buds wake up on the root collar, and the daylily grows successfully and even blooms. True, there are also unpleasant situations when the root collar completely decays. Fortunately, this rarely happens. Despite all the vicissitudes of our climate, you should not give up growing evergreen daylilies, because among them there are real masterpieces. In conclusion, I want to say that daylilies will not die without your care. They will grow and even bloom. But if you want modern hybrids to look healthy, well-groomed and enjoy abundant flowering, give them a little of your precious time. Trust me, they are worth it. Photo by the author
Step 5 - mulching

Step 6 - pruning, preparing for winter